Modifiers
Custom Modifiers are “presets” and are applied with a shortcut key, defaulting to ALT+V (Win) or Option-V (Mac). This works in conjunction with an Editor window cleverly named “Painter Modifiers,” available from the Tools/TilePlus menu or by clicking on the P.T button at the bottom of the Painter window.
Looks confusing? It’s a really powerful feature but there’s a learning curve.
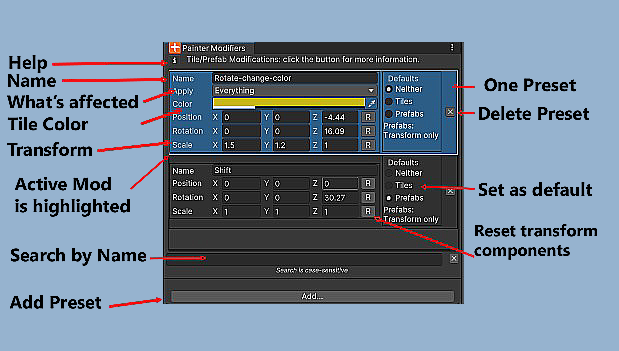
Each preset shown in the image has several components:
- A name field: used in conjunction with the Search box right above the Add button.
- A dropdown field “Apply” that has selections for how the preset is applied.
- A Color picker
- A three-element Position, Rotation, and Scale section (transform) with reset buttons for each element.
- A Defaults selection.
You use the Apply field to determine what this Modification does when activated. For example, you can modify just the color or just the transform for a single tile or all the tiles within a Multiple-Selection during preview.
You can also use Painter’s Grid Selection mode to apply the preset to an area of tiles on a Tilemap but within a Grid Selection.
Use the Color picker and transform fields to set up the modification.
The Defaults section of each preset is used to select a particular preset as the default for tiles or Prefabs. You might notice that the bottom preset is set as a default for Prefabs – in that case the Color picker is hidden since it doesn’t apply. That’s also true when a non-default preset is used to modify a Prefab.
What do the defaults do and what are they good for?
A good example is when you want to paint one or more tiles but always want the scale changed and you don’t want to fiddle with the keyboard shortcuts each time. Once a preset is set as a default, it is applied immediately each time that you choose a Tile or Prefab to paint, including when you Pick a tile from a Scene Tilemap during the Pick phase of a Move (that is, when you’re using the Move action).
Tip: You can use a default Tile modifier to emulate the UTE’s Z position field.
Just set the transform position Z as you like and use that modifier as the default for tiles. You can have several modifiers with different Z offsets, and it’s easier to select different modifiers than typing in UTE’s Z position field repeatedly.
Similarly, you might want to paint a Prefab several times but need it scaled the same way each time.
P.T Button
When a default tile or Prefab preset is active the Default Transform Indicator P.T at the bottom of the Painter window indicates that state.
- p.t No active default presets
- P.t Prefab default active but tile default inactive
- P.T Both defaults active
You can click P.T to open the Painter Modifiers window at any time.
How to Apply Modifiers
Non-default Modifiers are applied during the preview seen when moving the pointer over the Scene view while painting by using the ALT+V shortcut. This also applies during the Paint phase of a Move action.
When applied, the item selected (or previously selected if the Modifiers Editor window is closed) is used to change the transform of the tile or Prefab about to be painted to the one specified in the Modifiers Editor window selection.
The modification is applied to the current tile or Prefab in the Clipboard and persists until you select another object to paint.
The Reset Transform action or shortcut key (Default is ALT+Z) can also be used to reset the transform within the Clipboard.
The Clipboard’s icon shows the Transform icon when the current tile’s transform has been changed.
When using a preset on a Prefab keep in mind the same warning applied to using the Flip and Rotate shortcuts with Prefabs: it is easy to change the transform of the GameObject in such a way that it’ll be invisible to you when in 2D mode.
Search
The search field scrolls the list to the entry with a matching Name field, if any.
Tips
Tip: Dock the Modifiers Editor
- If you use it frequently, dock the Modifiers Editor to the left or right of Painter.
Tip: Copy transform and Color from Clipboard
-
If Painter has a modified single tile in the Clipboard, the Modifier editor’s "Add..." button changes to "Add from Clipboard". A click would copy the color and transform from the modified Clipboard Object to the new preset.
-
This only works with single tiles but is a nice shortcut to copy transform/color changes from a tile that you modified during preview.
Tip: Persisting Changes to Multiple Selections
- If you find that in a particular instance you can’t apply a default Modifiers to a Multiple-Selection Pick, you can use ALT-V to modify the tiles in the selection and click the F button to save that modified group of tiles as a Favorite or click the B button to save the selection as a Bundle.
Tip: Save and Load modifiers to a file.
Limitations
When changing Color or transform on tiles, the existing state of tile Flags for the tile asset will affect whether a Color or transform change is actually applied; for example, if the Lock Color flag is set at a position, then you can’t change the Color.
The system tries to check if modifications will work. For example, if you try to paint a tile after applying a Color modification but the tile asset has the Lock Color flag set, you’ll get a warning message, and the tile won’t paint.
If you were to paint the tile, the fact that the Lock Color flag is Set means that the color change will revert when the Tilemap is refreshed.
See the FAQ item: I Can’t Paint Modified Tiles
It's important to note that these modifications ONLY affect the Tilemap and never affect the tile assets themselves.